

The Jackpot
Recently we have been working on a shortmovie called “Der Hauptgewinn” (‘The Jackpot’), by German director Alice von Gwinner. It was a very interesting technical challenge and we learned a lot from it, so we wanted to share some of that with you. 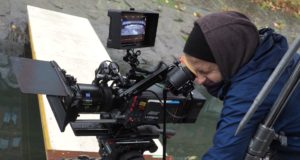 The movie was shot on the ARRI Alexa and the RED Dragon, both two professional cinema cameras, which are able to capture much more lighting information than regular consumer cameras. They achieve this by using specific encoding techniques which ensure the highest visual quality possible to the expense of some extra work to extract this information. And it’s that bit of extra work that we are going to focus on in this article. We already did a very brief talk about this topic during the Blender Conference in 2018. So if you are in a hurry, you can also watch that instead. :)
Pipeline
The pipeline for this project looked like this: The DOP (Director of Photography Conrad Lobst) defines the rough look of the scene and lighting, films the movie and then delivers the shots to the editing department. Once the edit is done an AAF (Advanced Authoring Format) is exported, along with the source footage. The colorist, Kay Dombrowsky from Trickkiste, can then import that AAF into his grading software and start working on the grade. In parallel to that the VFX department (well, us) receives a list with all the shots that need visual effects, as well as the source material for these shots. Our main software is Blender, with a little bit of AfterEffects for some easier shots. Once the VFX are finished we deliver the shots to the colorist, who then implements them into the grade, by replacing the original shots with the edited ones. But we have to make sure that we deliver the visual effect shots in the same colorspace, bitdepth and quality as the source footage.
The Footage
Most of the VFX scenes are in the part of the movie that was shot with the Alexa, so we decided to focus our efforts to get the ARRI footage to work first. There were two different encoding modes used for this movie: – ProRes encoded MOV files, with ARRI’s logarithmic LogC encoding. – ARRI’s own raw format ARRIRAW The ProRes files can easily be imported as video files, in theory even to Blender. To deal with the ARRIRAW files ARRI provides a converter software. From there you can export to various formats, like for example to EXR. What both format have in common however is the colorspace. The Alexa records in ARRI Wide Gamut, a colorspace which is significantly larger than rec709, Blender’s default colorspace. This is an important aspect, because the movie will also be shown in cinemas. The standard colorspace for that is DCI-P3, which is also larger than rec709. 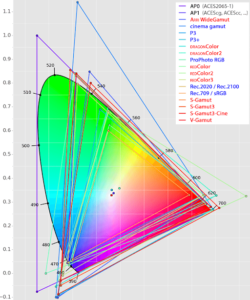 Why is that important anyway? A larger colorspace allows you to display more colors, especially the very bright and saturated colors. So in order to be able to deliver as much colorinformation as possible you want to work in the largest colorspace as long as possible. It’s only during colorgrading that the original colors of the footage will get their final look. Ideally the colorist can work on a monitor which is able to display the target colorspace, in our case DCI-P3, in some cases that can also be the new HDR standard rec2020. The monitors of the VFX artists use an sRGB profile however. If you wanna know more, ARRI has some excellent information on their website.
But as already mentioned Blender’s native colorspace is rec709. If we would import the source material, we wouldn’t be able to see the correct colors, because Blender would not be able to interpret them correctly. And combining CG elements with the footage would be a total mess as well.
Bitdepth
The problems start much earlier in the pipeline though. Blender uses FFmpeg to read and write MOV files. We can import the ProRes encoded MOV files with it, but somehow Blender managees to import the footage only in 8 bits. However, the Alexa records to ProRes4444, which is 12bit. So we would lose some data. Instead, a good way to preserve as much image information as possible and at the same time have a smooth workflow in Blender is to convert the footage to OpenEXR.
Nonlinear Encoding
The ProRes files from the Alexa have a very distinct flat look to them. 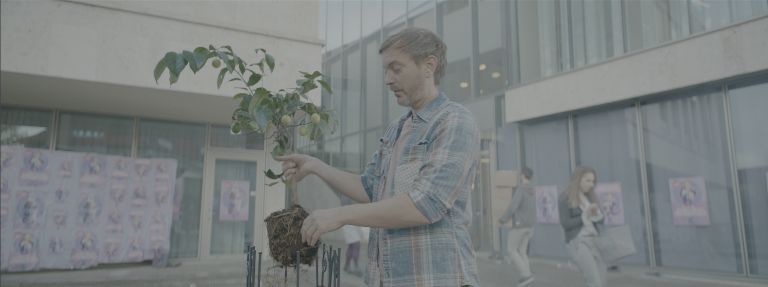 The reason for that is that they are encoded with a specific logarithmic curve, LogC, which allows the camera to encode a wide dynamic range of color information very efficiently. In order to restore the “normal” color information and map them correctly to your monitor (usually an sRGB display), you need a Look Up Table (LUT). In compositing or color grading applications that is usually done in a node or a specific setting. Blender does not have such a node nor setting. So instead of using a LogC transfer function, we can linearize the footage, since we are exporting to EXRs anyway. Below you see the same image as above, only with the rec709 LUT applied.
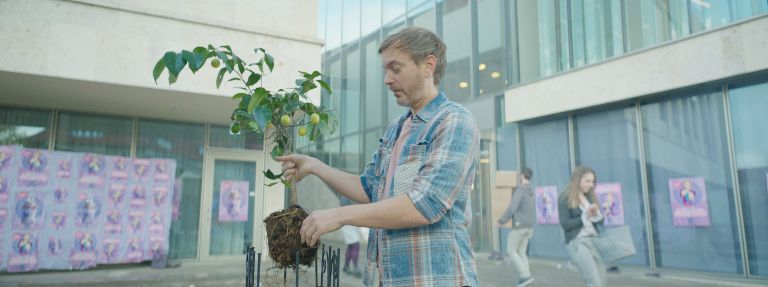
Colorspace
Still the problem of the ARRI Wide Gamut(AWG) colorspace remains. If we simply linearize the LogC encoded frames and import the resulting EXRs to Blender, the colors would still be wrong, because Blender assumes the EXRs to be in rec709 colorspace. There are two things we can do now:
1. Convert the ARRI Wide Gamut footage to rec709
2. Make Blender interpret AWG correctly.
Option 1 seems to be the easiest way and can be a solution if you know for sure that the entire pipeline and delivery colorspace will be rec709. However, as discussed above, we did want to deliver the VFX in AWG. Of course it is possible to convert rec709 back to AWG, but that would not restore the colors we lost when we converted from AWG to rec709.
So option 2 would be the right thing to do: Convert the encoding from LogC to Linear, but keep the colorspace as AWG and make Blender work in ARRI Wide Gamut as well. Here’s an image to demonstrate how the transfer function and colorspace affect the image.
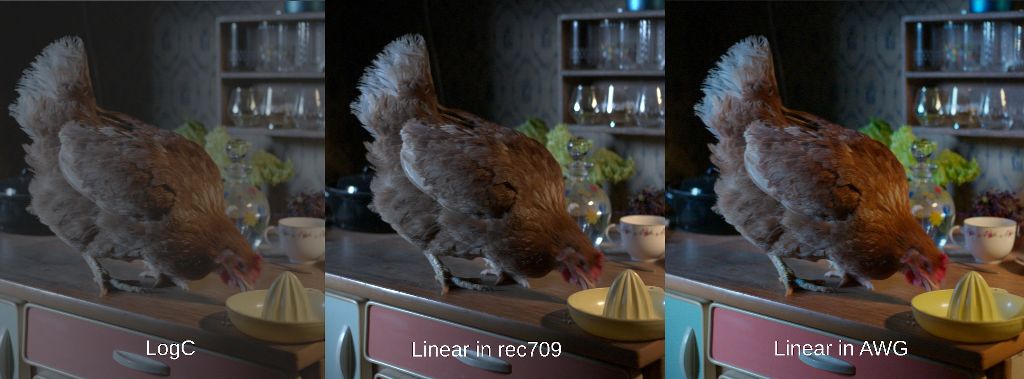
To the left you see Eugenie the Chicken, one of the two protagonists of the movie, in LogC. In the middle you see how an EXR in ARRI Wide gamut looks like when you open it in regular Blender, where it assumes the EXR to be encoded in rec709 colorspace. It looks better than LogC, but the colors are still somewhat dull. That’s because Blender thinks the color values are encoded in a different colorspace than they actually are. To the right you see how the same EXR looks like when Blender knows how to interpret ARRI Wide Gamut values and knows how to correctly map them to your sRGB Monitor. So how can we make Blender “understand AWG”? Well, we simply change Blender’s working colorspace to AWG. But changing Blender’s default colorspace? Is that even possible without compiling your own Blender version?
OCIO
Luckily Blender uses OpenColorIO for colormanagement. And luckily there is Troy Sobotka, who really understands this topic. He made a version of the OCIO configuration, which makes Blender work in ARRI Wide Gamut wherever possible (there are some parts of Blender which are hardcoded to rec709 unfortunately). Bl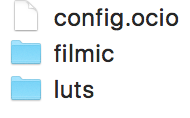 ender’s colormanagement is controlled by a couple of files in the
 colormanagement folder in the datafiles directory. The main file is config.ocio. It defines various roles, display configurations, colorspaces and looks. In the subfolder luts you can find various files which define look up tables for different transforms. All you need to do to make it work is to download the new colormanagement folder and replace the standard one (maybe backup the original folder though). If you start the Blender instance from this folder and switch the colormanagement View Transform to Filmic, it will use ARRI Wide Gamut. And not just for the EXRs: Also your colors, lights, HDRs will work in AWG now. It’s not just some fancy color setting, it really has an impact on many things in Blender. And that’s great, because when you do VFX you want to match the CG elements as close as possible to the source material. So the RGB values of your lights and assets should behave the same as the color values of your footage. And that, for instance, allows you to color pick the RGB values of the sky in the shot and use that for your world lighting. With Troy’s new configuration Blender now assumes that EXR files are encoded in ARRI Wide Gamut. Just in case you have an EXR file that was encoded in rec709 you can set that in the image options too.
The Workflow
Conversion
We used Blackmagic’s DaVinci Resolve 15 to convert the ProRes Footage to EXRs. It is available for free for Linux, Mac and Windows, which is great. Based on the edits we can select the clips we need, and only export the parts we need from the takes, plus some handle frames if needed.
Color Space Transform
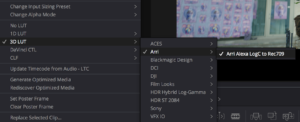 To quickly check how the files would look like with the correct transform from LogC to rec709 you can use a LUT. This is roughly how it will look like in Blender later. However, for our purposes we want to avoid rec709, so make sure to turn off the LUT before continuing.
 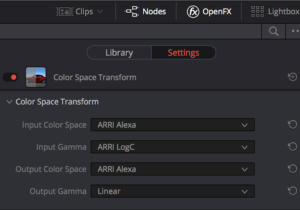 To convert the ProRes Files go to Color. From the OFX Library choose Color Space Transform. We know that the footage was recorded in AWG colorspace and encoded with LogC. So this is what we set. The target colorspace is also AWG. However, we want to linearize the footage, so we choose Linear as target transform. Now we can move on to Deliver and setup the render. In order to avoid gigantic file sizes I would suggest HalfFloat. That still gives more than enough bitdepth for our footage. To keep filesize down we used DWAA for compression. Yes, it is not lossless, but still good enough. And it does a really good job at generating EXRs with a small footprint.
In Blender
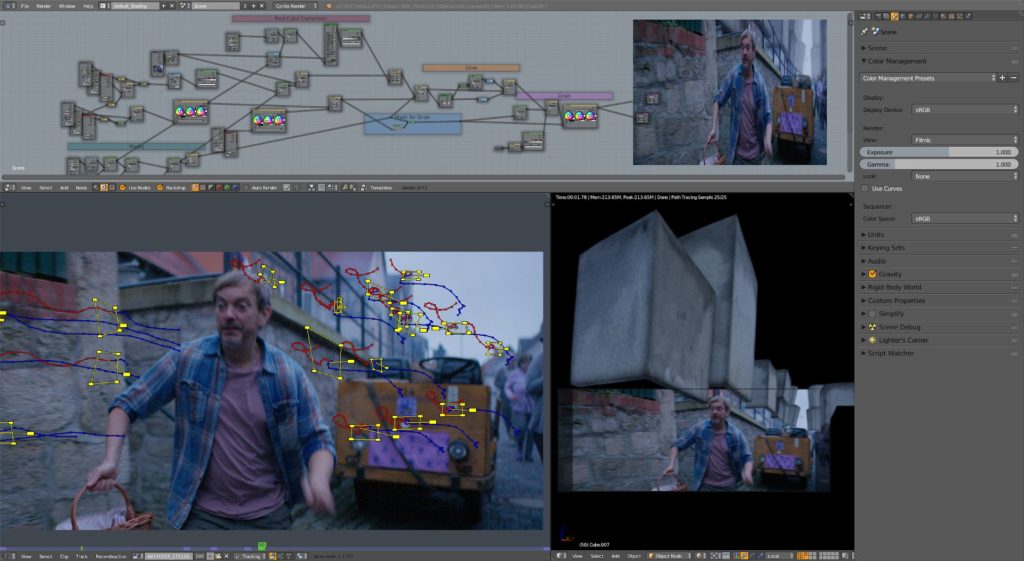
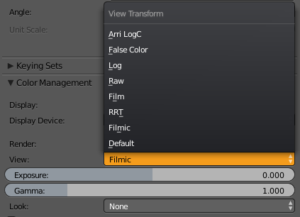 In your AWG Blender all you need to do is switch to the Filmic View Transform in the colormanagement panel. If you now import your footage, for instance as a movieclip, it will be displayed and handled correctly. So even though the colors in the EXRs are encoded in AWG, Blender knows how to map the colors to your sRGB display, based on the new
 config.ocio, so they will look very similar to how the LogC->rec709 LUT in Resolve made them look. In the screenshot you can see the Arri LogC View Transform on top of the menu, so you know you are using the correct colormanagement folder. Nevertheless, we are going to use the Filmic View Transform. Keep in mind though, your lights will now behave differently. So if you have setup a scene to have a certain look with a regular rec709 Blender, it will look very differently if you open it with AWG Blender.
Issues
Some things you should be aware of when working in AWG:
– The Blackbody node for lights uses hardcoded rec709 values, so the light temperature settings will produce very different RGB values in AWG, so you can’t rely on that.
– Sky Texture also assumes rec709 colorspace, so this won’t work correctly either.
– The Keying node is hardcoded to rec709 as well, so you will need to do a bit more tweaking to get a working key. We did manage to get decent keys with it, but overall it would be nice if all nodes in Blender would use OCIO instead of hardcoded values.
– In the current development version of Blender 2.79 the Proxy generator in the Clip Editor doesn’t handle the colorspace conversion correctly, so we had to convert it manually. To streamline the process a bit we wrote a little script which creates a scene in the background and converts the AWG EXRs to rec709 JPGs in the background, which will work correctly in the 3D Viewport background images.
Benefits
Even though there are some issues still, we and the colorist were very happy with this workflow. Once we finished our scenes, we rendered them as EXR sequences and gave them to the colorist. He had already started to do the grading with the original source footage. He could simply copy his grading setup from the source clips to the VFX clips, put a Linear->LogC Color Space Transform node at the beginning of his node tree, and it matched perfectly. All in all this was a super smooth workflow, thanks to Troy’s OCIO config file.
Aspect Ratio
This movie was shot with anamorphic lenses, which means that at first the image looks squeezed along the x-axis. The original image dimensions were 2880×2160, essentially an aspect ratio of 4:3. Of course you have to correct the aspect ratio at some point, either before VFX or during grading. We decided to work with the anamorphic footage and only do the correction in grading. That way the CG elements can be integrated better into the frames. If you would correct the anamorphic footage to square pixels it would have the dimensions 2880×1080 (or 5760×2160, but that’s a bit overkill), which is an aspect ratio of 2.667:1. However, the delivery format of this movie was Cinemascope, 2048×858, which has an aspect ratio of 2:39:1. So quite a substantial part of the frames would be cut off left and right. Nevertheless we worked in the original Alexa aspect ratio 2.667, in order to make it easier for the colorist to later simply swap the source footage to our vfx plates and also to make camera tracking easier, by maintaining useful tracking information at the sides of the frame. Still it’s good to be aware of what exactly will be in the frame later and what’s going to be cut off, so we used the Safe Areas setting in Blender’s Camera properties for that. Setting the X value of the Action Safe Margins to 0.104 will show the cinemascope aspect ratio inside the 2.667 camera dimensions. 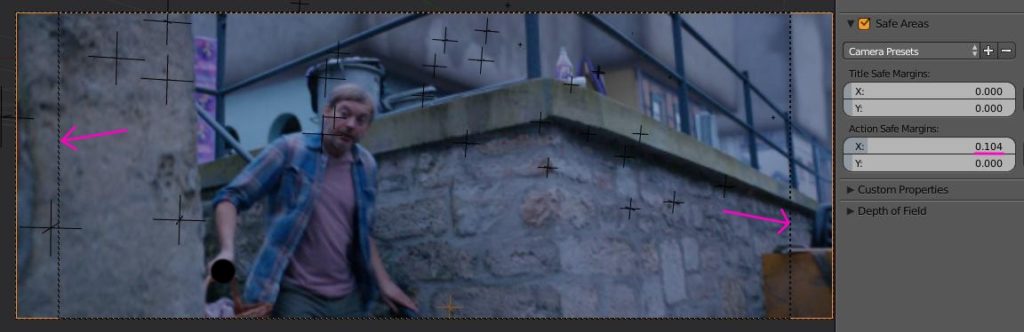
Bonus
As mentioned earlier, the Alexa was not the only camera used for this shortfilm. Some scenes have been shot with the RED Dragon, another popular cinema camera. Similar to the Alexa this one also records in a wide color gamut in order to capture as much lighting information from the scene as possible. In the picture below you can see that the gamut covers quite a similar area as the Alexa. So we used Resolve to convert everything to AWG EXRs, by setting the input colorspace to DRAGONcolor2 and the Input Gamma to REDgamma4, and Output Color Space to AWG and Output Gamma to Linear, just like before with the Alexa footage. Then we could do all our effects, render as EXRs, and all the colorist needed to do was convert the colorspace back to what it was before. Easy Peasy!
Thoughts
Color is a really complex, yet essential topic. Before this project I had really no clue at all about it. It’s only because of Troy Sobotka’s patient teaching that I understand at least a little bit about it. Being able to deliver our work in the correct format, encoding and colorspace gives me a lot more confidence for future projects. Knowing that Blender is capable of giving me exactly the output I need is very reassuring. And I am confident that the developers will improve the aspects that still need work. For instance, it would be great to have a fully colormanaged Blender, without any hardcoded rec709 assumptions. I should be able to work in any colorspace I want. HDR displays are becoming more and more common, so it would be nice if Blender would be able to display larger colorspaces correctly, not just on sRGB monitors but also on DCI-P3 or rec2020 displays.
To anyone who is scared of colorspaces, gamuts and all that stuff: Don’t worry, it is not *that* horrible. And it is at the very core of what digital artist do. Pixels and Colors are the foundations of our work, and we should know a little bit about these foundations to do our work correctly. I certainly have a lot to learn still, but it also feels good not to be alone in the dark anymore, when it comes to colors.
If you wanna dive even deeper, here’s a nice link http://cinematiccolor.org/
Awesome work! And thank you so much for writing it up so efficiently. This is an insanely complex topic, and this definitely helps demystify it a bit, and knowing this is possible in Blender is great. Thanks again to you, your team, and Troy! Fingers crossed for the developers someday being able to make colorspace much easier to deal with throughout Blender.
Excellent post and a very interesting subject! Thanks!
Great! Thanks, Seb!
The link seems to point to the main git-hub page tough (https://github.com/sobotka)
Shouldn’t it point directly to https://github.com/sobotka/ocio-blender-default/tree/arri-reference ?
Yes, thanks a lot! I’ve corrected the link.
It seems latest blender versions have problems with colorwheels managing the AWG color space.
I’ve opened a bug report > https://developer.blender.org/T64548
Troy has isolated the issue and proposed some possible solutions, still the issue as not been triaged yet.
Hope this topic is going to be relevant for more people so we can expect to get a medium/high priority fix.
I´m worried about the “hard coded Rec709” parts.
Is this still going on with Blender 2.81?
Also: What about ACES?
Sadly I cannot really read C code, but if, for example, I am interpreting the file source/blender/compositor/nodes/COM_KeyingNode.cpp in Blender’s source code correctly, it assumes rec709. As do several other nodes. So yeah, some parts of Blender still assume rec709. This will hopefully change in the future.
About ACES: I think the same thing we did with ARRI Wide Gamut should also work with ACES. It’s not a clean solution yet, since some things will not work smoothly yet. Keying does work, but would work better if the footage would be encoded in sRGB. Blackbody and SkyTexture nodes also don’t return the correct color values when you use a different color space. And some other things. But overall I would say it’s kind of doable.
All you need is an ACES config.ocio for Blender. How to generate that though I have no idea. Troy Sobotka might be able to help there. I also know that Sam van Hulle (https://twitter.com/sssssamvh) is interested in an ACES pipeline with Blender, so he might already have such a config.
If I render out an exr sequence out of blender but I use an online cloud render farm service that may not support installing different ocio configs into blender, would the colors be correct if I configure the colors using the ocio config with arri wide gamut installed on my pc then render out the exr’s on the cloud render farm as 32 bit raw exr’s without any color space transforms since the renderfarm may not support changing blenders ocio settings, and then take the exr’s into davinci resolve and set the color space to arri wide gamut.
No, without the correct config.ocio Blender will not render the colors correctly. As far as I know http://www.render.st is going to include custom OCIO configs in their upcoming version of their renderfarm. Don’t know when that will be available though.
Great article, thanks for sharing your workflow, I have a few questions:
1)Regarding the AWG footage-As I understand, EXRs files are exported from blender without the filmic transformation. So, as I understand- the colorist got an output of EXR’s files in AWG linear, without the filmic transformation?
2) Regarding the RED Dragon footage:In the part where you write:
“So we used Resolve to convert everything to AWG EXRs, by setting the input color space to DRAGONcolor2 and the Input Gamma to REDgamma4, and Output Color Space to AWG and Output Gamma to Linear, just like before with the Alexa footage. Then we could do all our effects, render as EXRs, and all the colorist needed to do was convert the color space back to what it was before. Easy Peasy!”
When you write:all the colorist needed to do was convert the color space back to what it was before.”, do you mean that the red footage was converted to AWG and then you exported in blender EXR’s images , and then the colorist in resolve converted the images to log c-is that what you meant by “what that was before”?
Hi!
About 1) Correct. We exported the EXRs without the filmic transform, but in AWG linear. Actually, as far as I know it is not even possible to save an EXR with the filmic transform baked in. They are always linear with no view transform applied.
About 2)
The colorist had originally imported the footage into Resolve and started working and grading with it, without our VFX work.
So he was grading with the RED footage in DRAGONcolor2. In order for us to do the VFX he exported the RED footage as AWG EXRs.
We kind of abused AWG as an intermediate colorspace which we could use in Blender. We exported our VFX as EXRs in AWG. The colorist could then convert the AWG EXRs back to DRAGONcolor2 and REDgamma4, with nearly no loss or colorshifts or so. That means he could then use the same grading he had already done on the RED footage and simply apply it to the VFX plates and it looked the same.
I hope I could clear things up a bit :)
Hi Sebastian!
Thank you for your answer:)
It’s great you managed to find a way to work with such a wide gamut footage in blender.
Super useful article! Would love to have an update on how things work in Blender 2.8* and 2.9* – for example is the 8-bit .mov thing still an issue? And could you use ACEScg instead of AWG as the intermediate colorspace?
Also, any tips for doing a similar workflow with Adobe After Effects instead of Resolve? We’re currently using the OpenColorIO plugin but not totally sure we’re doing it right :-)
Hi Dave, thanks a lot!
In theory we could have used ACES as well. I mean, the whole workflow is more or less what you would do with ACES anyway. But at that time we initially only needed AWG, and later realized we’d have to deal with RED footage as well. We only had the AWG ocio profile for Blender, so we didn’t bother to try with ACES. You could ask around if someone has an ACEScg profile for Blender, maybe on Twitter or so (hashtag #b3d).
We are currently not doing any VFX jobs, so I am a bit out of the loop when it comes to color management. The entire process should be the same in 2.90, but I am not quite sure. Try it! I’d be interested to hear if it works for you :)
We did try to use the same workflow with AfterEffects, but it was a pain. And we were never sure if we were doing it “right” either :D
Good luck!